How to create a website in less than 1 hour, Even if you are a complete Beginner
Step-by-Step Instructions for Beginners

Make a website in less than one hour using WordPress
We will show you how to make a website using WordPress. You can get started with your website design even if you haven’t decided on a domain name yet. We will show you how to register your domain later on. Website hosting will also be covered, with our top choice based on speed, reliability and reasonable price.
There has never been a better time to create your own website than now, and its easier than ever!
Get started for Free!
Discover how to get started right away without spending a dime and without even providing a credit card number.
Get started even without a Domain Name!
Your domain (website name, like www.example.com) is very important and you will definitely want to give it some thought. Once you come up with a few domain names that you like, you need to see if they are available for you to register. Some of your top choices might already be taken, but don’t worry, we will show you how to find a great domain name that is available for you to register.
Instead of having you get stuck on this step, we will show you how you can get started with your website right away. Once you register your domain name, we will show you how to easily link your website to your domain.
Full Step by step Instructions for Beginners!
Follow our step-by-step beginner’s guide to easily make your own website with WordPress. Over 450,000,000 websites (that’s 450 million) are powered by WordPress, including plenty of Fortune 500 business websites. WordPress powers 37% of all websites worldwide, so it has been proven to work extremely well. Best of all, its free!
How to Get fast and reliable Website Hosting!
There are thousands of web hosting companies to choose from. Over the years we have found one website hosting company in particular that we like the best. They are very reliable (99.99% uptime), extremely fast (your website will load quickly), affordable, and their support is great. They offer a 14 day trial period, so you can get started right away, without paying a dime and without even giving them your credit card info.
How to Create a Website – Step by Step Beginner’s Guide

Please note that some of the links on this website are affiliate links, and at no additional cost to you, we will earn a commission if you decide to make a purchase. Read more
Step 1 – Create a Web Hosting Account
Sign up for Nexcess Liquid Web Hosting
Liquid Web / Nexcess offers Managed WordPress Hosting that is packed with features and is very reasonably priced. If you pay a full year, it’s only $12.67 per month ($152 per year). If you prefer to pay it on a monthly basis, it’s just $19 per month.
They also have a 14 Day Free Trial and don’t even ask for you to provide them with a credit card number. The only drawback with the 14 day free trial is that when you go to upgrade, the price is $190 per year instead of $152.
When you sign up for a Nexcess Liquid Web hosting account, they will create a temporary URL (website address) so that you can begin building your website right away, even if you don’t have a domain name yet.
Once you register a domain name, it is easy to change the temporary URL so that your website will show on your newly registered domain name.
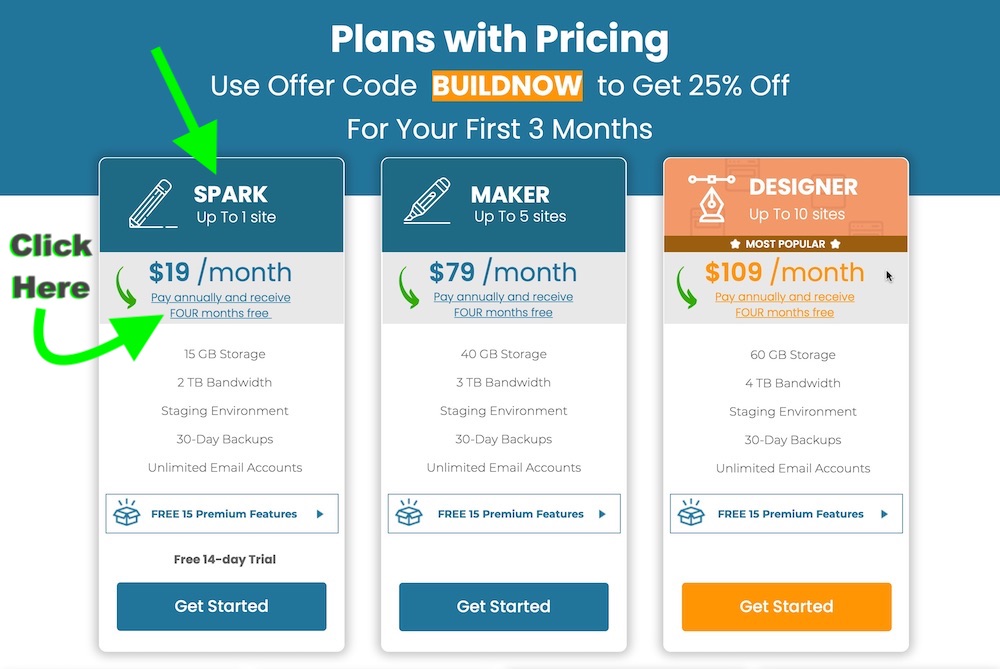
Click here to open a Nexcess Liquid Web Hosting Account
To get started, click on the link above. You will be taken to the Liquid Web / Nexcess sign up form that will show you 3 plans: Spark, Maker and Designer. We will be choosing the Spark plan. You can always upgrade later on, if the need arises.
The Spark plan has 3 options to sign up. You can save money by paying a full year; just click on “Pay annually and receive FOUR months free”. If you prefer, you can choose to pay month by month. The third option is to go for the Free 14-day Trial, keeping in mind that when you upgrade the price won’t be as low as if you had signed up for the annual plan from the start.
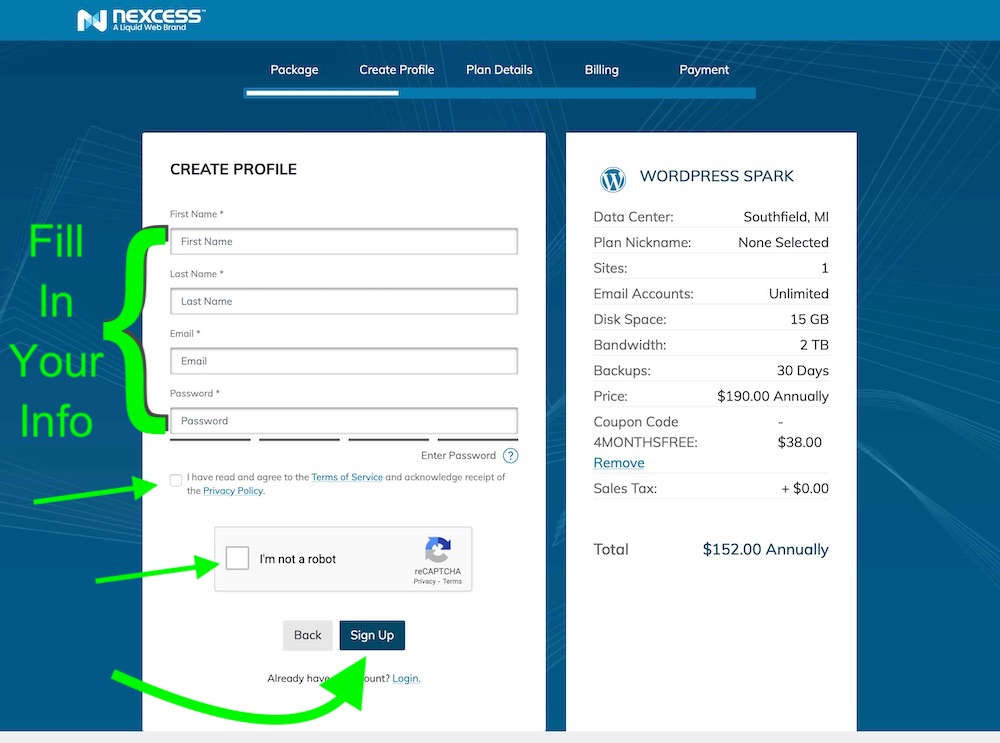
Once you make your choice, you will need to fill in your information, create a password, agree to the terms of service and privacy policy, click on the “I’m not a robot” and then click on the Sign Up button.
Other Hosting Options
If you decide that Liquid Web / Nexcess isn’t the right fit for you, here are two other popular hosting companies:
Hostinger
Bluehost
Step 2: Open your WordPress dashboard
What is WordPress?
WordPress is a Content Management System (CMS) that powers over a third of the websites on the internet. It is very easy to use and is suitable for beginners, but is also very robust and flexible. With WordPress you can build just about any kind of website that you can imagine. Be it a small business website, an online store, a blog, news website, online portfolio or whatever, it can be done with WordPress.
How to Install WordPress?
Seeing as your Liquid Web / Nexcess Spark plan is a Managed WordPress plan, WordPress is automatically installed for you when you create your account.
How to access the WordPress dashboard?
The WordPress dashboard is where you go to change the look of your website. It is the “back-end” control panel that allows you configure your website and add more functions. There are several ways to logon to WordPress and access your WordPress dashboard.
Method 1) Open your WordPress dashboard from your Liquid Web / Nexcess account
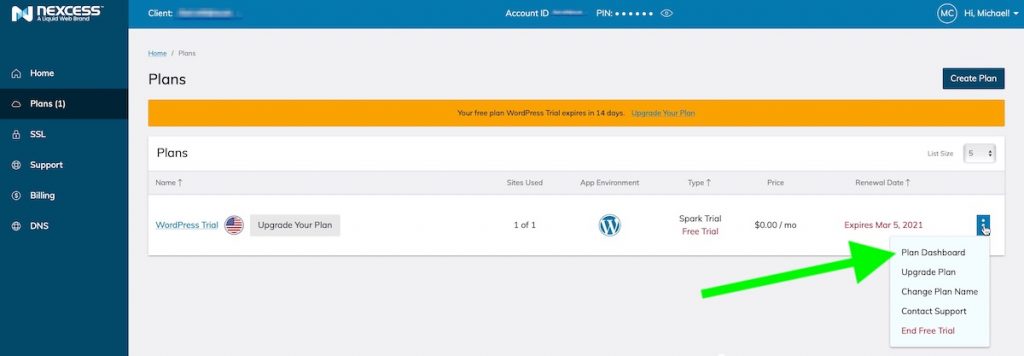
One method to access your WordPress dashboard is to go to your Liquid Web / Nexcess dashboard and click on Plans on the menu on the left hand side. Then click on the three dots at the end (on the right hand side) and select Plan Dashboard. Again, go to the 3 dots and select Site Dashboard.
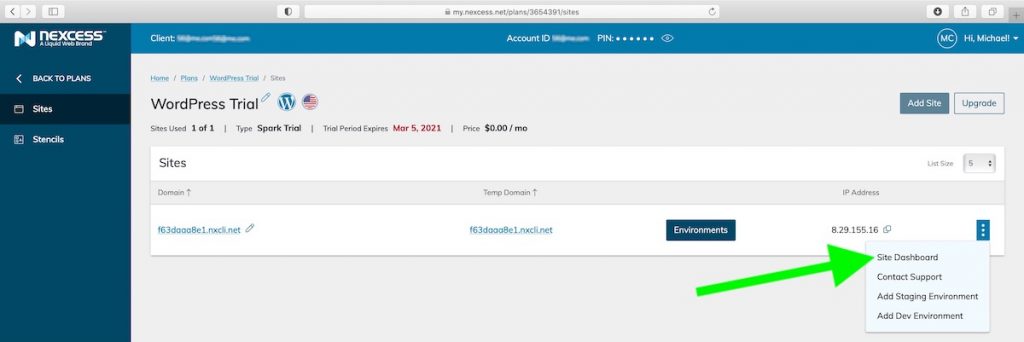
This should take you to your WordPress dashboard that will look like the following:
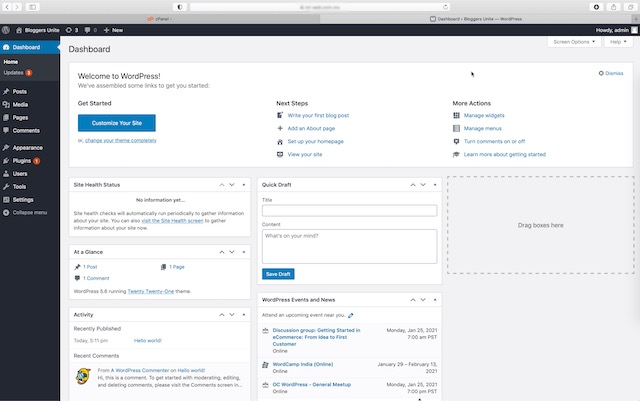
Method 2) The regular way to open your WordPress dashboard
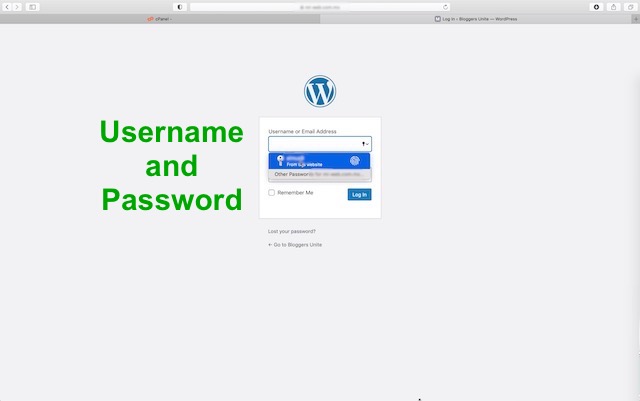
A more common way to access your WordPress dashboard (it works on any host) is to type your website address into your browser followed by /wp-admin. It will look like example.com/wp-admin, although some hosts like Liquid Web / Nexcess create a temporary domain for you when you first sign up. In that case you will use the temporary domain followed by /wp-admin. Either way, you will be taken to a logon page that will ask you for your username and password.
Method 3) Open your WordPress dashboard while viewing your website
A third method to open your WordPress dashboard is probably the most convenient, assuming that you are logged on to WordPress already. Just open your website and at the top you will see a toolbar. If you hover over your website name in to top left-hand corner, a drop down menu appears with the following options: Dashboard, themes, widgets and menus. We will get into each one of those later on, but for now all you need to do is click on Dashboard.
The toolbar also shows several other options such as Customize and Edit Page. We will also explain these later on.

Step 3: Install the Astra Theme
Astra for WordPress
WordPress needs a theme for it to work. Even though they call it a theme, its not necessarily the topic or subject of your website. It’s more like an app. When you install WordPress, it automatically installs the default theme. If you go to your website, it will look something like this:
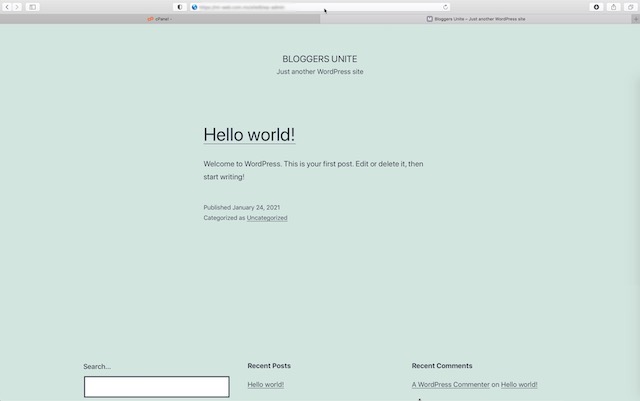
As you can see, its not very exciting, but we are about to change that by installing a different theme. There are thousands of WordPress themes, with some being better than others. A theme that is highly rated and is one of our favorites is called Astra. Here we will show you how you can easily install it.
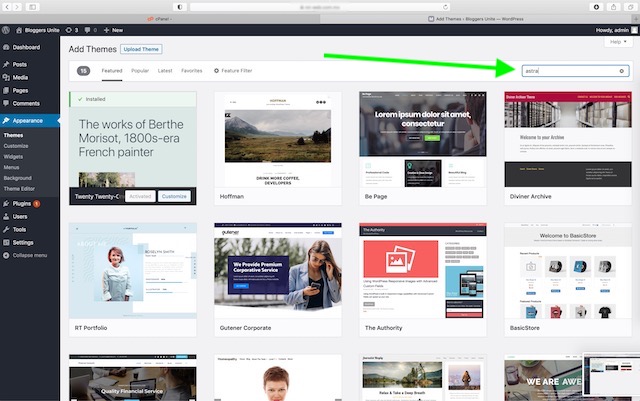
First, go to your WordPress dashboard as outlined above and go to Appearance > Themes and click on Add New.
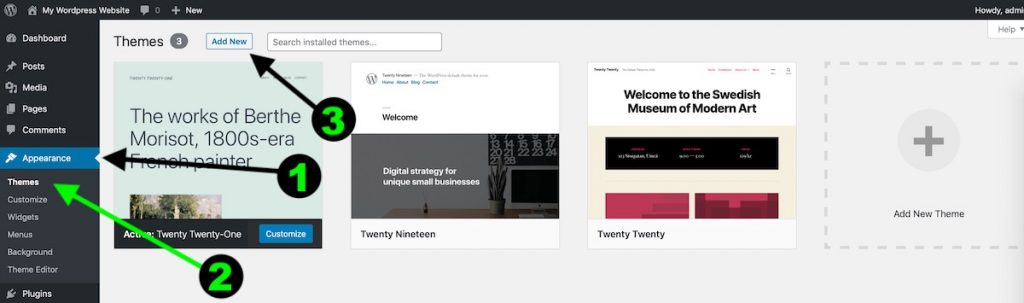
In the search bar type in Astra.
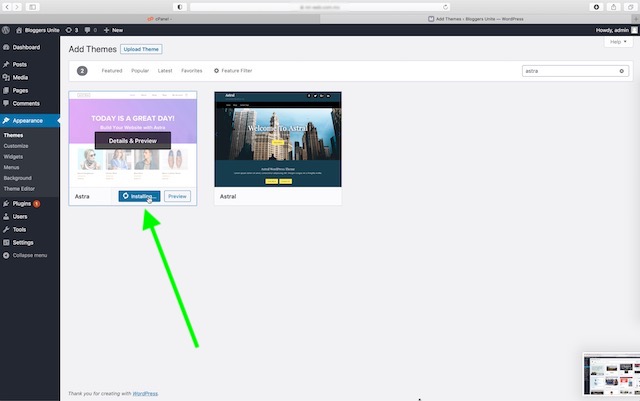
Click on the Install button inside the Astra option.
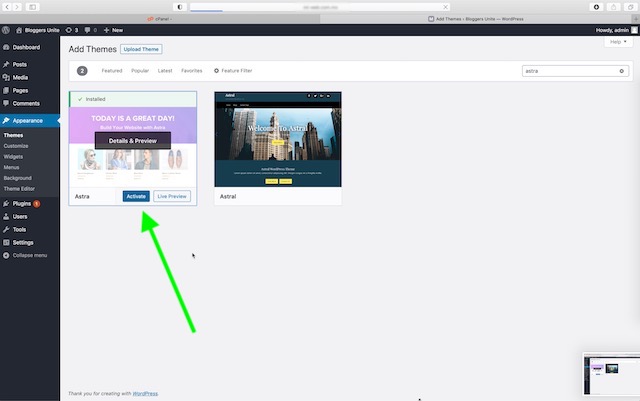
Finally, click on Activate.
Step 4: Install an Astra Website Template
Your website will still look pretty plain even after installing the Astra theme, but don’t despair. In the next step we will be installing a complete website with just a few clicks.
Astra Starter Templates
One of the reasons that Astra is our favorite WordPress theme is that it offers complete website templates that are absolutely free. They have more than 140 attractive and functional website templates available, with almost half of them being free.
Astra makes it very easy to install one of these complete website templates. Besides installing the Starter Templates plugin, it also installs the Elementor page builder and all the other plugins and everything that your chosen template requires. For example, if you choose an online store template, Astra will install WooCommerce for you. By default, Astra installs sample content for you in all its templates. After that it is just a matter of customizing the content and layout to match your website design goals.
Installing a complete website using Astra Starter Templates
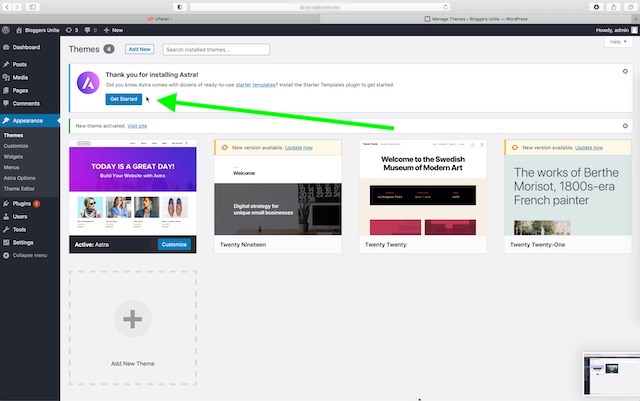
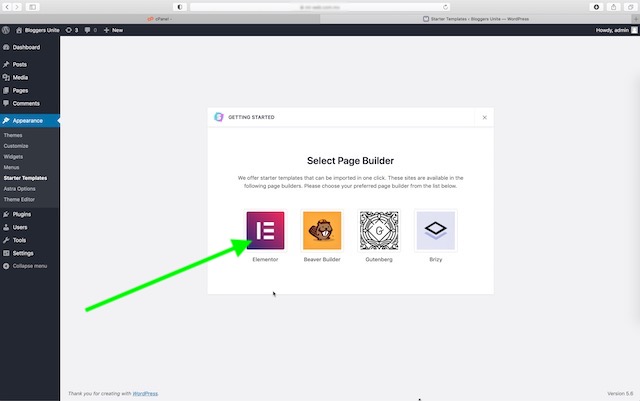
Right after installing the Astra theme, you will be shown a Get Started button. Go ahead and click on it.
If the Get Started button is not shown, you will need to go to Plugins > Starter Templates > See Library. If it isn’t installed yet, go to Plugins > Add New and do a search for Starter Templates – Elementor, Beaver Builder, Gutenberg & Brizy Templates. Install it, activate it, go to Plugins > Starter Templates > See Library and skip down to Choosing an Astra Starter Template.
Go ahead and select the Elementor page builder.
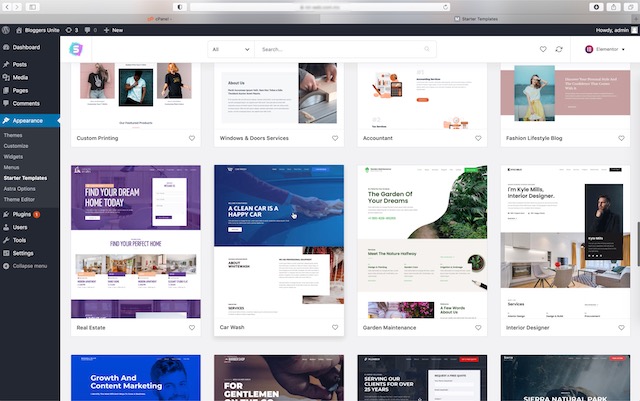
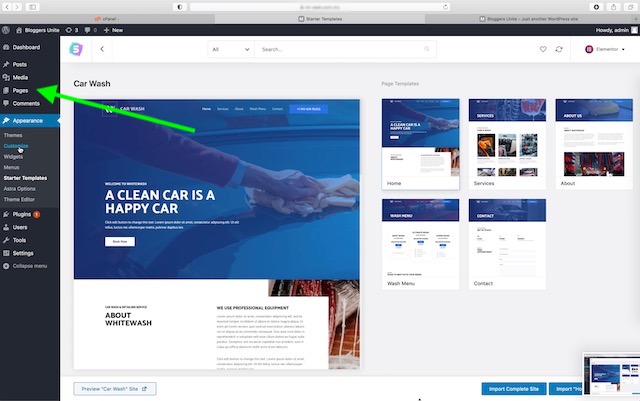
Choosing an Astra Starter Template
Now you will be shown all the Starter Templates. You can scroll thru them and click on any of them to see what they look like and see what pages they include. Most of them include a home page as well as contact, services and about page, but it varies from one template to another.
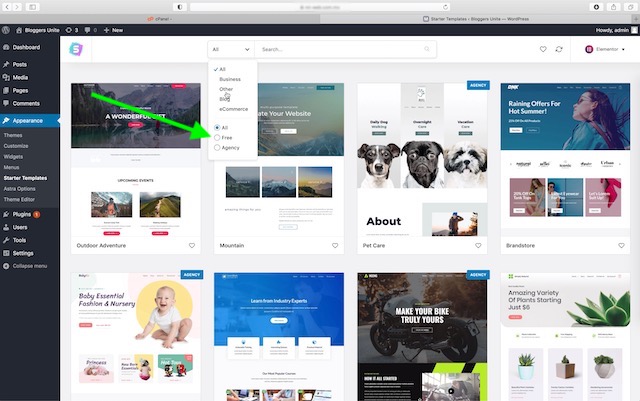
The ones that are labelled “Agency” are only available if you have the paid agency version of Astra, but there are lots of free templates to choose from. There is a drop down menu that allows you to select just the free templates, if desired.
When choosing an Astra Starter Template, we suggest going with one that is similar to what you are looking to achieve. They have many that are geared towards service based businesses. Others are for product based businesses and will install a WooCommerce online store on your website. They also have templates for blogs, online academies (it installs LearnDash), coaches, writers, photographers, restaurants and many others.
Importing an Astra Starter Template website
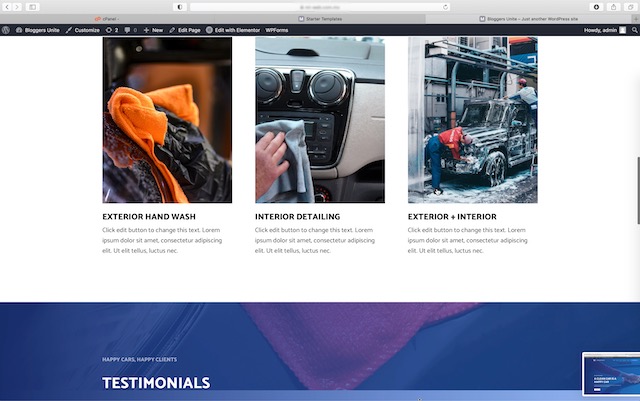
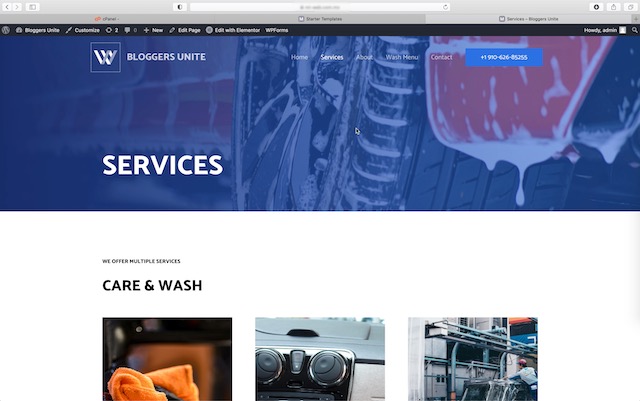
Once you have found a website template that you like, click on Import Complete Site. For this example we will be using the Car Wash template that is a good general purpose website. It includes a Home page, Services, About, Contact and a Wash Menu page that can easily be converted into a price list page.
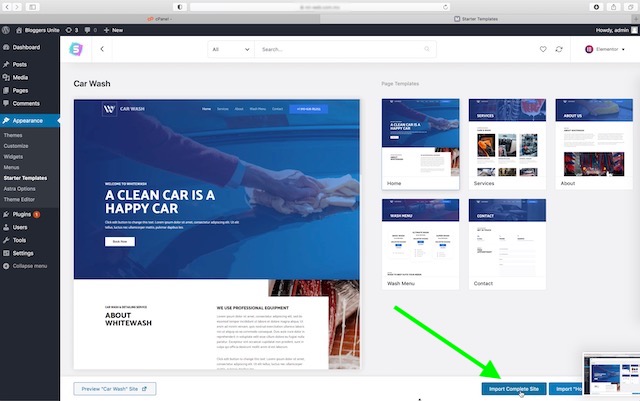
Seeing as this is a fresh install, we will click on Delete Previously Imported Site and click on Import. If you already have been working on your website and have content that you want to keep, then don’t select Delete Previously Imported Site.
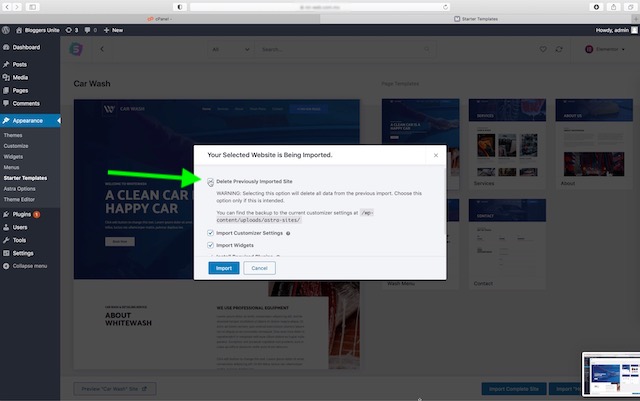
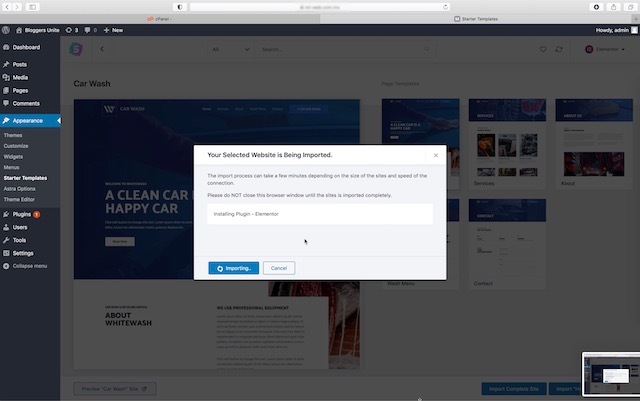
You will be shown a notice saying that Your Selected Website is Being Imported and when it’s done it will say Imported Successfully. This might take a couple of minutes.
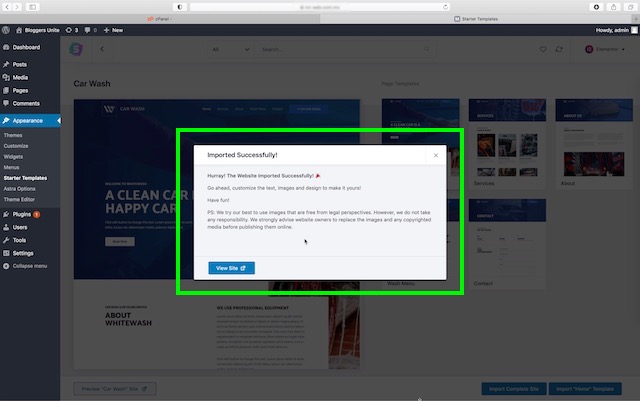
Viewing your newly installed Astra website
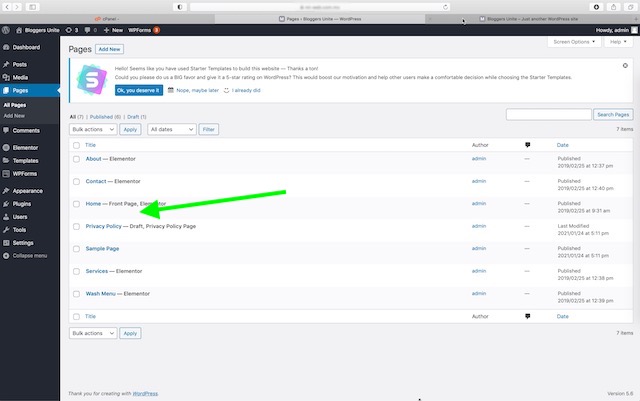
Click on the View Site button or type your domain (or temporary domain) into your browser to see your newly installed website. The website template that we just installed is a fully functional website with several pages, including a home page, services, about, pricing and contact page. Each one can be customized to suit your needs. If you don’t need one or more of those pages, they can be deleted, and if you need more, new ones can be added. I will show you how to do that further ahead.
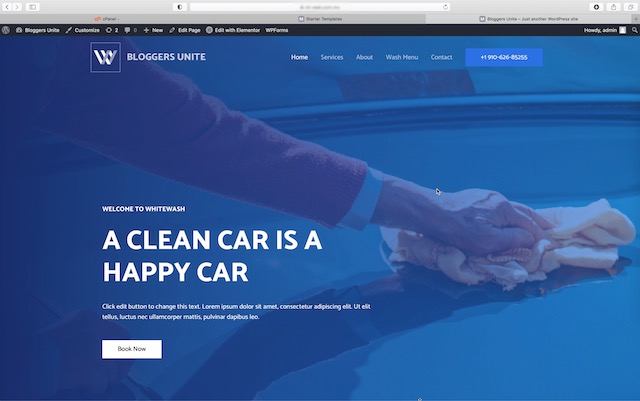
If you installed the Car Wash template, this is what your website will look like:
Step 5: Customize your Content
Getting Started with the Elementor Website Builder
Creating and customizing your website has never been easier. Using WordPress along with the Astra theme and the Elementor website builder will allow you to make your entire website quickly and easily.
You will recall that we selected the Elementor page builder in one of the previous steps. Elementor is the most popular website builder for WordPress. It is what is known as a WYSIWYG editor; What You See Is What You Get. Being drag-and-drop, it is very easy to use and it shows you what your website will look like as you are editing.
Logon to your WordPress Dashboard
To get started, logon to your WordPress dashboard and click on Pages > Home > Edit with Elementor. Remember that you find the the WordPress dashboard logon by typing /wp-admin after your website name as in example.com/wp-admin.
You can also do this by viewing your website and clicking on “Edit with Elementor” at the top to open it editing mode.

Getting to Know Elementor
Once you are in the editing mode, on the left side you will see the Elementor panel and on the right side the editing screen that shows your website content.
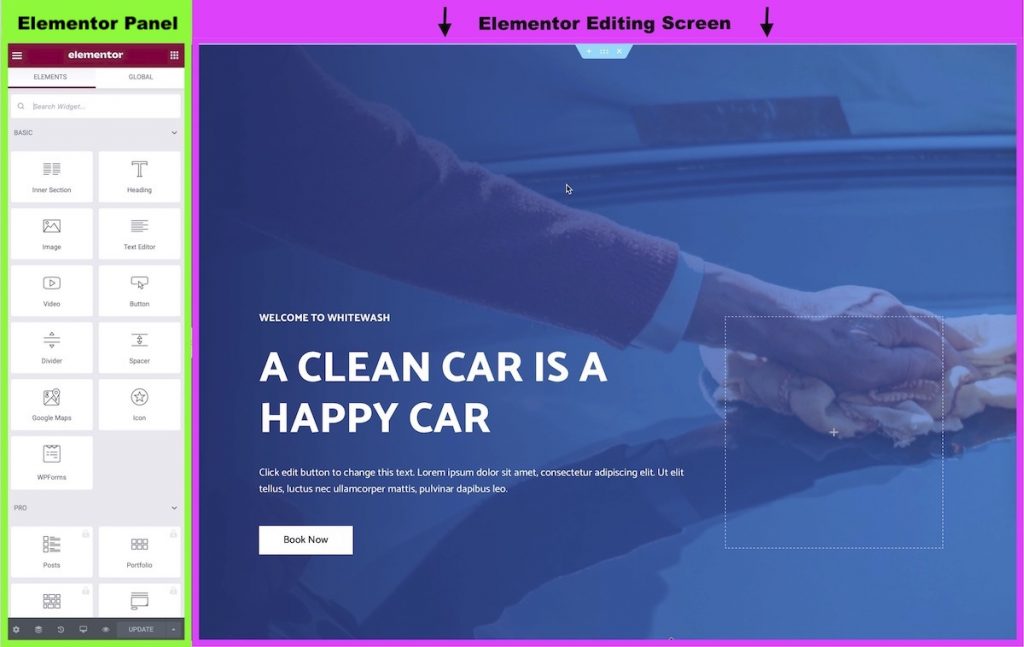
The Elementor Panel on the Left Side
The Elementor Panel on the left will show you different tools and options, depending on what you are working on. If you click on a section, column or widget, the options for that item will be shown in the Elementor Panel. We explain this in detail in the next section.
If you click on the 9 dot square in the upper right hand side of the Elementor Panel, you will be shown all the tools (called widgets) that you can use to edit your website by dragging them over to the Editing Screen on the right side.
Widgets
There are all kinds of widgets to choose from, ranging from those that add text, headings and images to your website, to testimonials, image carousels and contact forms. You will see 6 groups of widgets:
- Basic
- Pro
- General
- Site
- WooCommerce
- WordPress
All of these are available for you to use except for the Pro widgets. For those you need to get the paid version of Elementor, but don’t worry, you can create a fabulous website using the free widgets.
The WooCommerce widgets are for use with the WooCommerce plugin. This plugin allows you to turn your website into an online store so that your customers can make purchases directly on your website.
You might want to take a few minutes to scroll down the list of widgets, just to get an idea of all that is available.
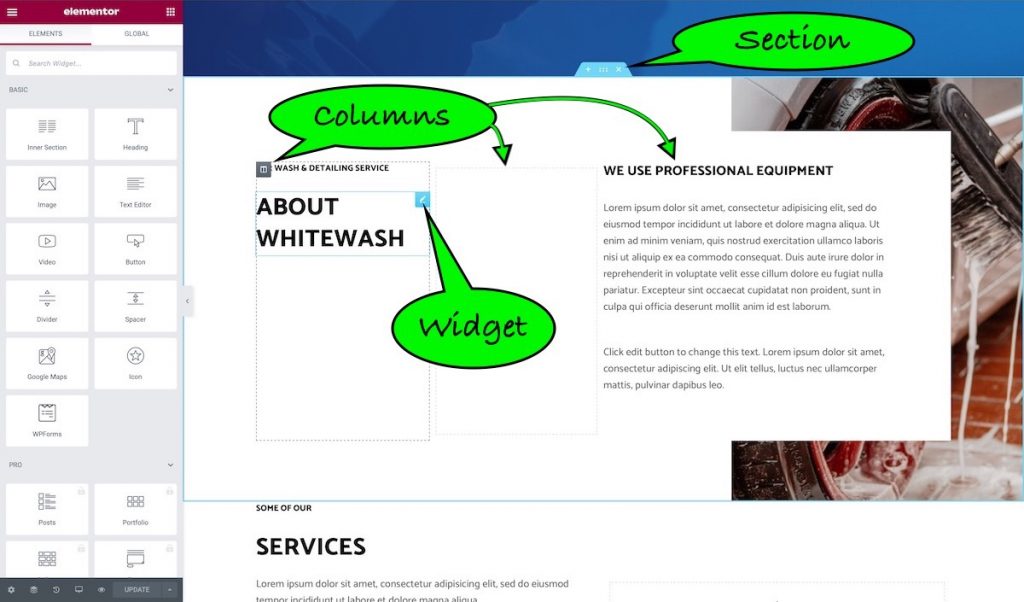
The Elementor Editing Screen – Sections, Columns and Widgets
On the right side you will see the editing screen which is where you can edit your website’s content and layout.
It is made up of sections. When you hover over a section it will be outlined by a thin blue line, with a small blue tab at the top. This tab has 3 options: Add a new section, Edit the selected section or Delete it. Also, the middle dots allow you to move the entire section up or down by dragging and dropping.
Inside the sections there are columns which when hovered over are highlighted by a dotted line and column icon in the upper left-hand corner. Clicking on the column icon allows you to edit that column.
Inside the columns is where you can add widgets. When you hover over a widget, you will see it outlined in the same kind of blue line as used for the sections. A pencil handle (button) for editing the widget is in the upper right-hand corner.
You can add as many widgets as you want to each column. For example, you might have a large heading, a smaller one, an icon, some text and a call-to-action button, all inside the same column.
Adding additional columns is easy to do. Just click on the column handle in the upper left-hand corner and it will display several options, including Add a Column and Duplicate. The width of each column can be adjusted by dragging the edges left or right.
You can also add an Inner Section to a column, which are columns inside a column.
If you create a new section and drag a widget directly to it without creating a column, Elementor will automatically create the column for you.
Just as sections can be moved up and down by dragging and dropping, columns and widgets can also be moved around in the same manner. Any of them can also be copied and pasted.
Summing it up, widgets go inside columns that go inside sections. All of them can be edited, moved around, re-sized, duplicated and deleted.
How to Customize your Content
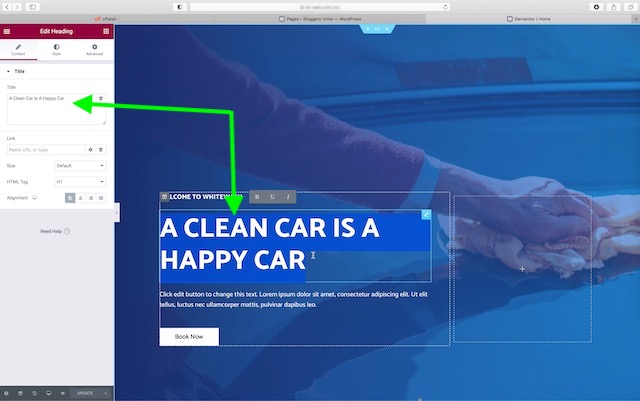
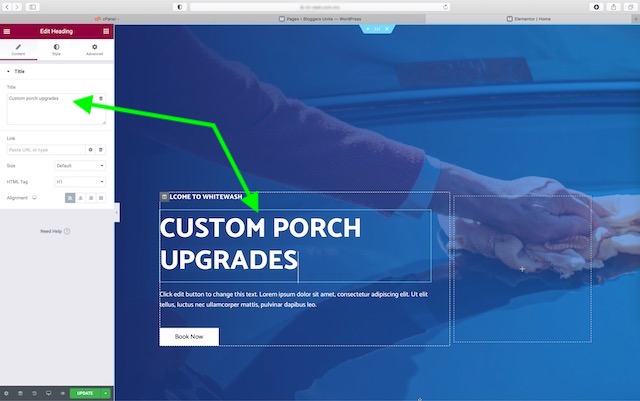
All of the content can be customized by clicking on the item that you want to edit. The options for each item will show on the left, in the widget panel.
For example, to change the heading we just need to click on it and all the options will be displayed on the left. If it is just the heading text that we want to change, we can type it in directly into the editing screen on the right or edit it in the widget screen on the left.
How to Customize Elementor Sections, Columns and Widgets
Customizing the look of Elementor sections, columns and widgets is done the same way as we changed the heading above. Just click on the handle of the item that you want to change.
For Widgets, you will be shown 3 tabs labelled Content, Style and Advanced.
For Sections and Columns you will see Layout, Style and Advanced.
Here is what the Elementor Panel will show for Sections, Columns and Widgets:
Options for Sections
Options for Columns
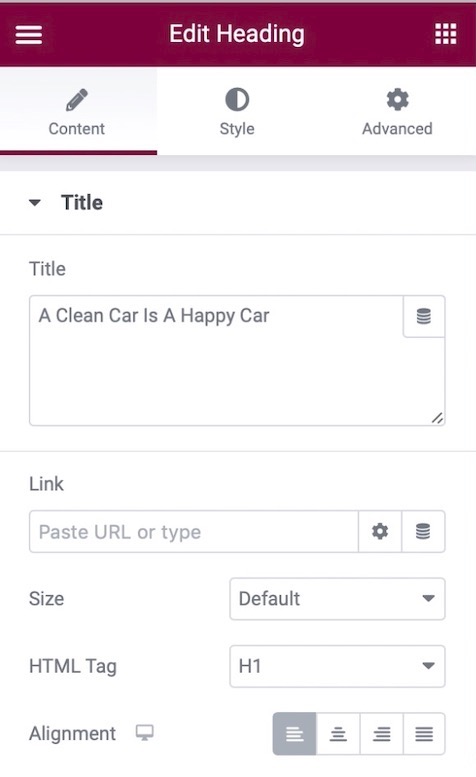
Options for Widgets (Heading shown)
These different options are explained in more detail below.
The Elementor Layout Tab
The first tab for Sections and Columns is the Layout tab. Much like the Content tab for Widgets, the Layout tab shows settings that apply to Sections and Columns.
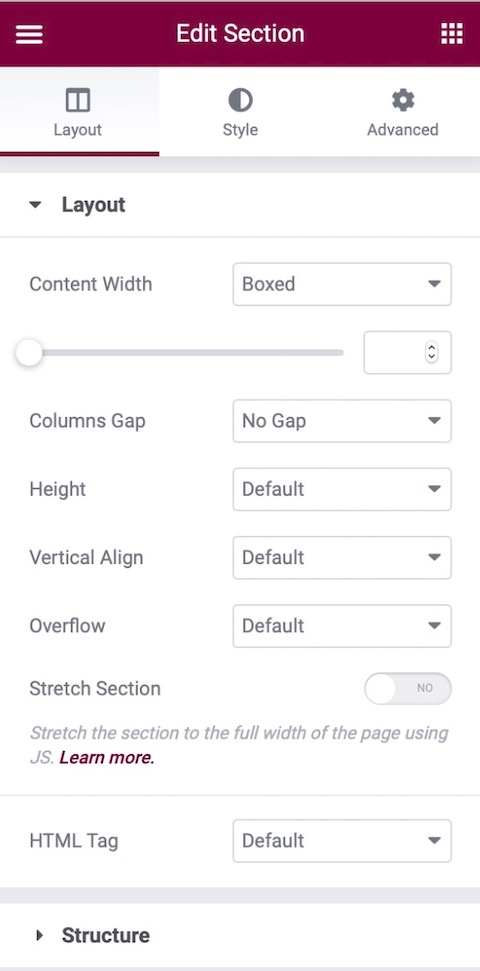
For Sections, the Layout tab allows you to set the content width, columns gap, section height, vertical alignment, overflow and section stretch. If you are just getting started and are working on a website template that you imported, you should probably leave most of these settings as they are, until you get a better grasp of what each one does.
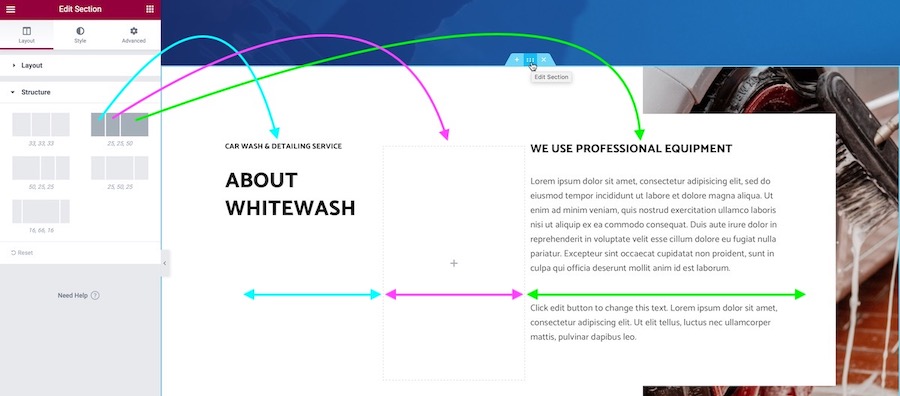
At the bottom of the Sections Layout tab you will notice that there is a Structure option. This provides a convenient way to adjust the size of your columns. In the example below we have 3 columns set at 25%, 25% and 50%, meaning that the first two are 1/4th of the width and the 3rd one is one half width. Then we change that to 33% for all three, meaning that they are all one third of the width. The screenshots below show the difference.
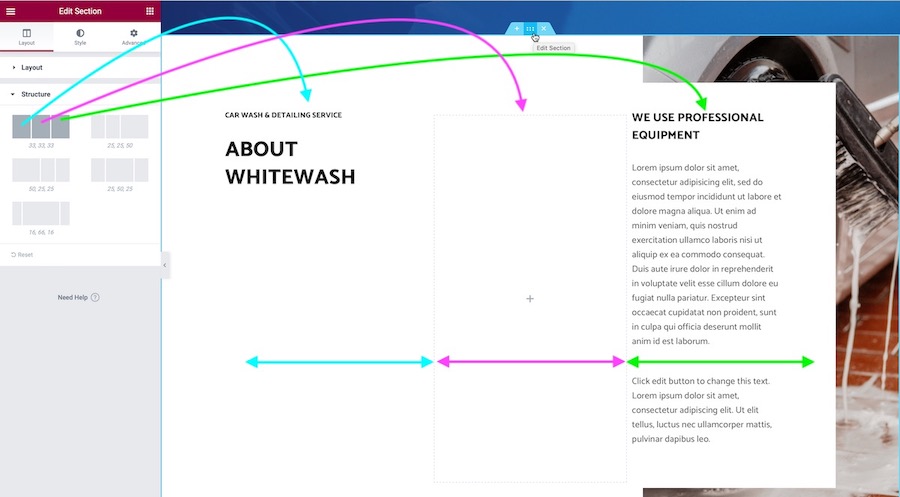
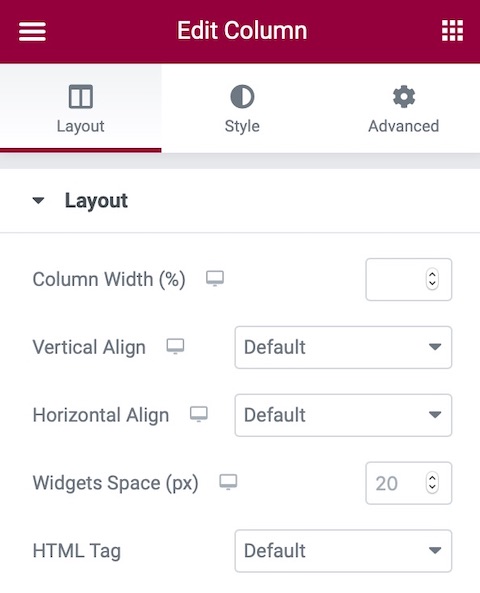
For Columns, the Layout tab also lets you adjust the Column Width, but only for one column at a time instead of for all columns at once, as the Sections Structure option lets you do. In addition, the Columns Layout tab has controls for Vertical Align, Horizontal Align, Widgets Space and HTML Tag.
The Elementor Style Tab
Sections, Columns and Widgets all have both Style and Advanced tabs that allow you to really get creative with your customizing. When you select an item you will be shown the options that apply to that particular item.
Sections and Columns Style Tab
For Sections and Columns, the Style tab shows Background, Border and Typography options. You can change Margins, Padding, and Motion Effects under the Advanced tab.
Widgets Style Tab
The Style tab shows different options for Widgets, showing those that apply to the widget that you have selected. For example, the Text Editor Style tab shows you options for Alignment, Text Color and Typography. If you select an Image in the Editing Screen, the Style tab will show you options for Width, Height, Opacity, Border Type, Border Radius, and Box Shadow.
The Elementor Advanced Tab
Just as with the Style tab, Sections, Columns and Widgets also have an Advanced tab. They allow you to set Margins, Padding and Motion Effects. Also included are the Responsive options that allow you to adjust the way that your website will look when viewed on a desktop, tablet or mobile device, with different settings available for each.
Widgets have additional options under the Advanced tab for adjusting Background, Border and Positioning.
There are several other controls under the Advanced tab, including Z Index, CSS ID, CSS Classes, Attributes and Custom CSS. We won’t be discussing those options here because they are meant for experienced users.
The Elementor Content Tab
For Widgets you will be shown a Content tab instead of the Layout tab that is shown for Sections and Columns. Depending on what kind of content it is, the Content tab will show you several different options. Here are some of the ones that are used most often:
Text Widget Content Tab
The Text Editor works much like a regular word processor. You can add text, format it, add bullets, images, links and other items. Splitting your text up into columns is also possible and it allows you to adjust the spacing between columns.
Image Widget Content Tab
Images can be added using the text editor or by using the Image widget. The Content tab allows you to choose the image from your Media Library or Upload it. It also gives you the option to use a Pixabay image. Pixabay is discussed in further detail below.
This tab also allows you to set the image size, alignment, caption and link, if desired.
Heading Widget Content Tab
For headings, the Content tab allows you to add a link, set the size, set the HTML tag (H1, H2, H3, etc) and set the alignment.
The heading HTML tags should be used the same way that you would use them in an outline or table of contents. Each page should only have a single H1 tag that tells readers what the page is about. You can use H2 tags for the main topics, H3 for sub-topics, H4 if there are sub-topics under H3 and so on. Just make sure that you use them in order to make them more useful for your readers and so that search engines get a better idea of what your page is about.
Content Settings for Other Kinds of Widgets
Each different kind of widget comes with it’s own settings under the Content tab. A good way to see what each one does it to add a widget and play around with the settings to get a feel for what they do.
Changing your Website’s Images
Adding photos and images to your website is very important. For example, you will definitely want to include product photos if you are creating an online store. Including images of charts and graphs is often an easy way to convey information that would be hard to summarize in writing. Sometimes you will want to add images just to make your website more visually appealing.
Where to get high quality images?
If you have your own high quality photos and/or images, that is your best option. If you don’t have them right now, that’s not a problem. There are a number of websites that have thousands of high quality photos available for you to download for free and use on your website.
Two of our favorite sites to download photos for free are Pixabay.com and Unsplash.com. Just search for the term that you are looking for and lots of related photos should be displayed.
If you can’t find what you are looking for, a paid site like DepositPhotos.com might be what you need. They have several options for purchasing photos with the average price being in the $4 to $5 range per photo.
How are images displayed on your website?
Images can be displayed in several different ways on your website, with 2 of the most common being just a standard image (using the image widget) or as a background image. Other common ways to show images are with the Image Box widget, the Testimonials widget or in the Text Editor, among many others.
If you are customizing a template, sometimes the process of changing an image can get confusing. The first step is to click on the image to see if a thumbnail of the image shows on the left hand panel under Content. If it does, it was placed there with a widget and changing it is pretty straightforward.
If the image has text or other items on top of it and/or if a thumbnail doesn’t appear under Content on the left panel, then it is most likely a background image. Seeing as the big image on our example website is a background image and you are probably anxious to change it, we will go ahead and show you how to do that.
Changing a Background Image
The most common background images are for Sections or Columns, although they can also be used for Widgets.
Background Image in Sections and Columns
You can tell that the image of someone wiping a car with a rag on our example website is a section background image because it covers the entire section and it has text on top of it. If we click on the 6 section dots and open the Style tab we will see a thumbnail of our image. Next we need to hover over the image and click on Choose Image.
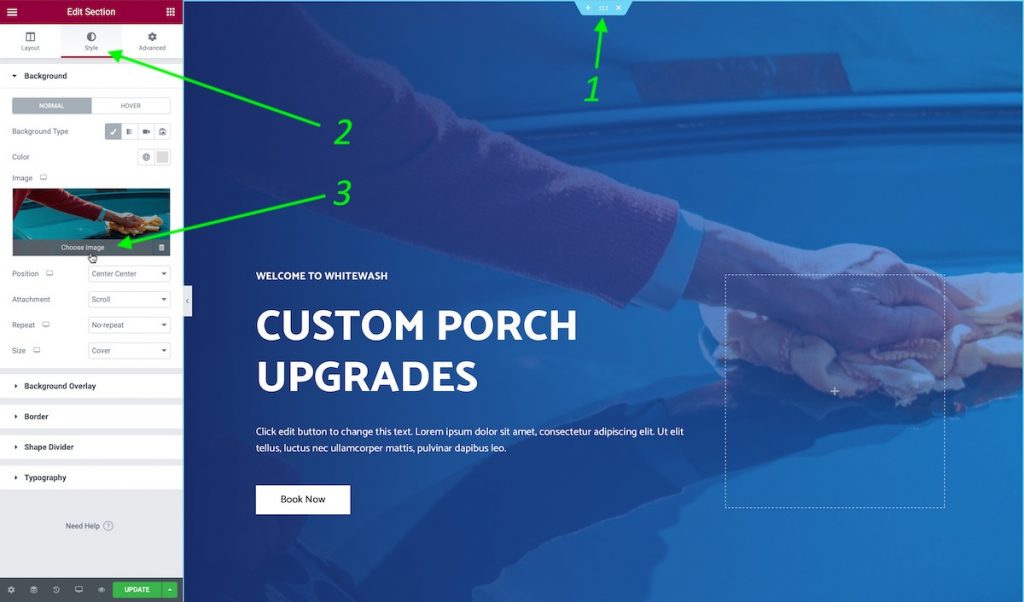
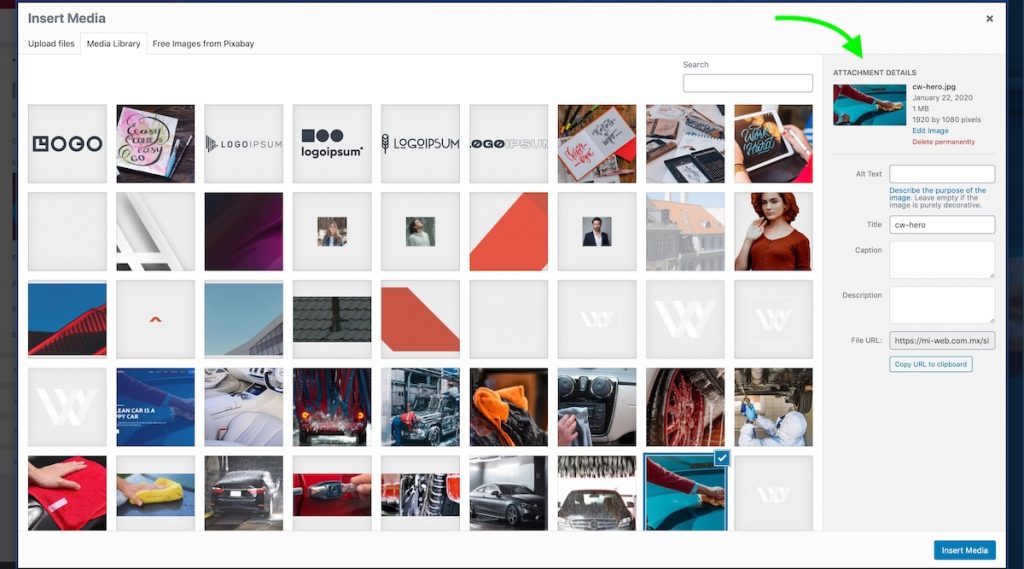
This opens up your options for changing the background image. You can upload an image, pick an image from your existing media library or choose one from the thousands that are available on Pixabay.com.
A thumbnail of the current image is shown on the right side of the screen, along with information such as its size. For now you will want to stick with images that have a similar orientation, be it horizontal or vertical. In this case we will get a horizontal image from Pixabay.
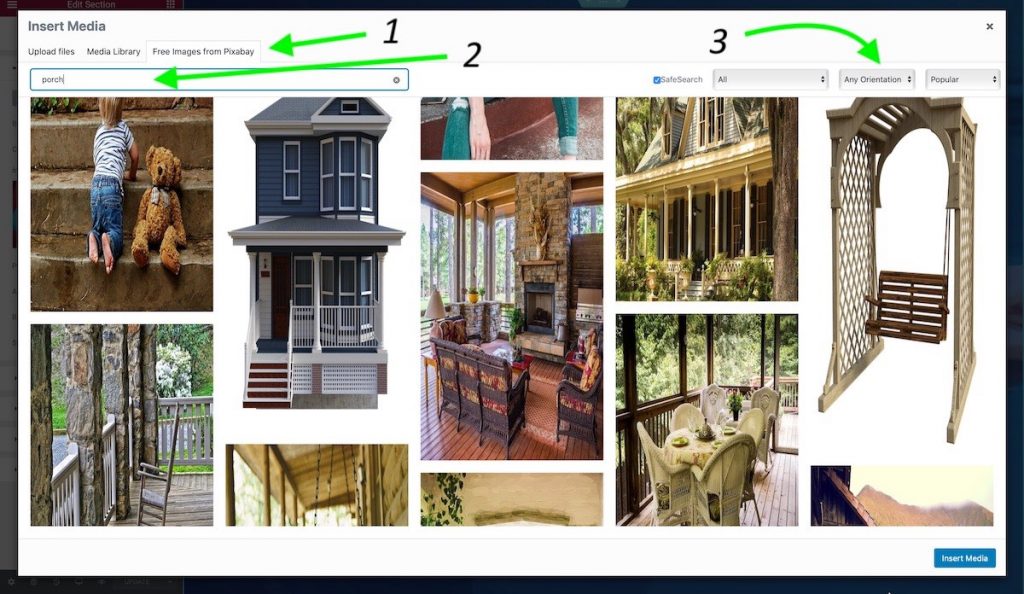
Once you click on the Free Images from Pixabay you will be shown lots of random images. You can use the search bar to narrow down the selection and you can choose to be shown only horizontal or only vertical images, if desired.
Widget Background Images
Most widgets allow you to add a background image by clicking on the image and going to Advanced > Background > Background Type > Image. After that the process is the same as above.
Widget Images
The process of changing a widget image is very similar to changing a background image, with a few differences.
When you click on a widget image you will see a thumbnail of the image on the left hand panel under Content. Hover over the image and you will be shown the Choose Image option.
Once you click on Choose Image you will be shown the Insert Media screen outlined above, with options to upload an image, insert an image from your media library or download one from Pixabay.com. Just follow the same process as described above for a background image.
Background Options
Most items give you a several options for setting the background:
- Background Image
- Background Color
- Gradient Background
- Background Overlay
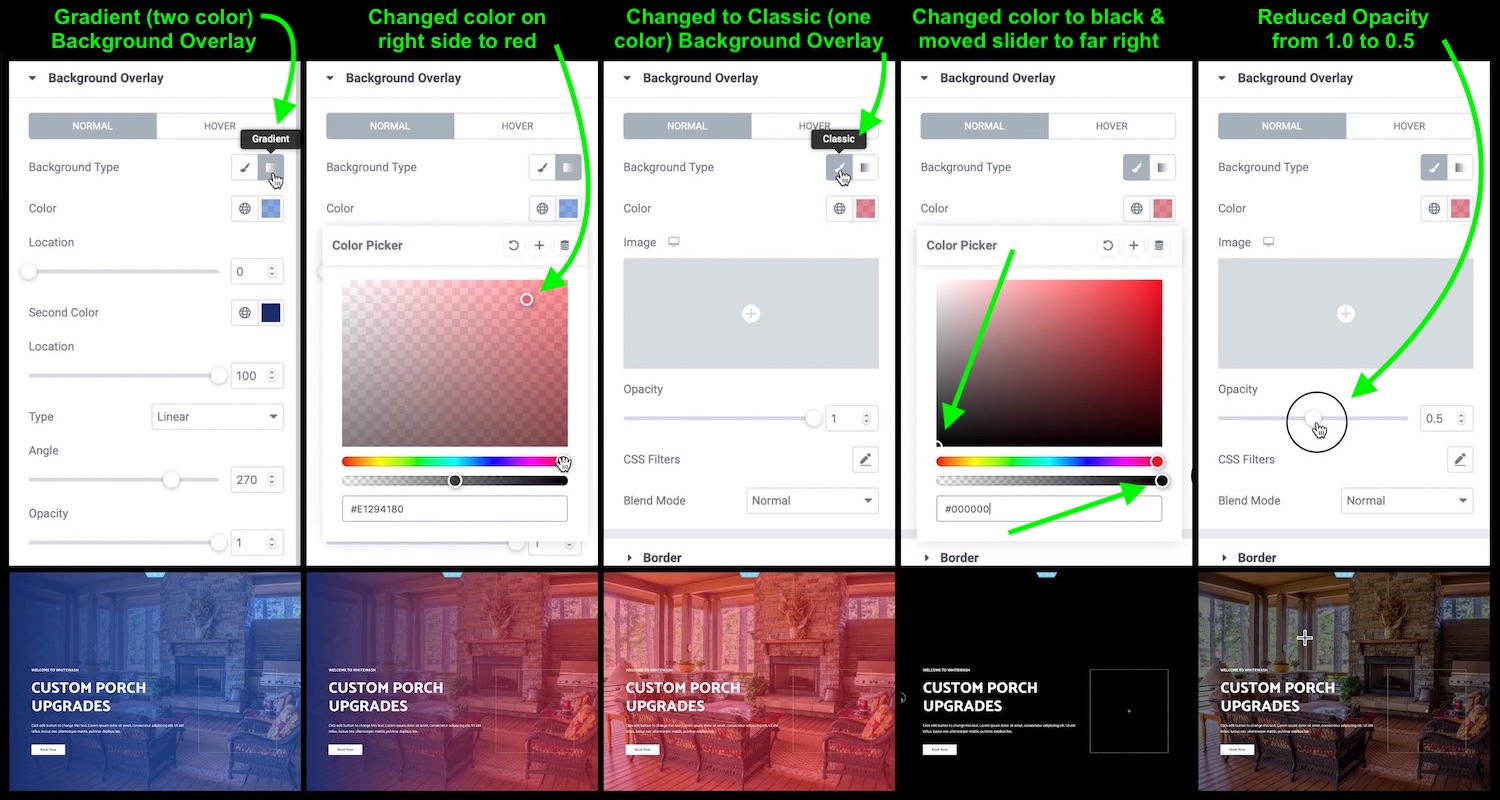
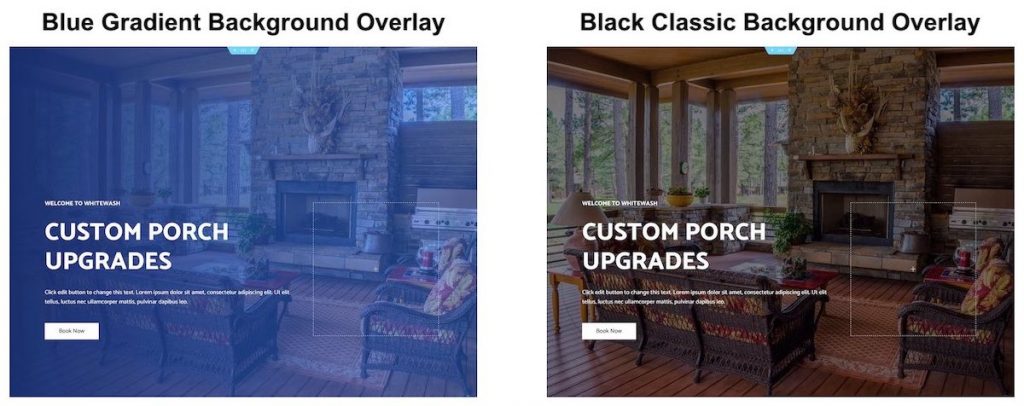
We already changed the background image in our example website, as explained above. Now we are going to change the blue gradient overlay to a black classic overlay.
Seeing as this is a section overlay that we want to change, click on the blue section handle at the top and then go to Style > Background Overlay. If the Background Overlay option isn’t showing, select a Background Type first. The procedure is the same for changing a column background, but for widgets you need to go to Advanced > Background.
Our current background overlay is a two tone blue Gradient background overlay. Just so you can see how it works, we selected red as one of the colors and left blue as the other. You can see that now the overlay goes from blue to red. The Angle control lets you move the colors around. Try sliding it back and forth to see how it works.
Next we click on Classic background overlay which is a single color (red, in this case). Go to color picker and drag the color circle all the way to the bottom left hand corner, which is black. Then we move the second slider all the way to the right.
Our background has gone completely black, but that is easy to adjust by exiting the Color Picker and then reducing the Opacity, which is currently set at 1.0 (completely opaque). The other extreme is 0 which is a Background Overlay that is totally transparent. We want to pick a value in between so that our text is easy to read and our background image is still visible. You can move the slider left and right to see how it looks. In this case we are setting it half way, at 0.5. I think that it looks a lot better than the blue background overlay that we had.
Here are before and after screenshots of our background overlay:
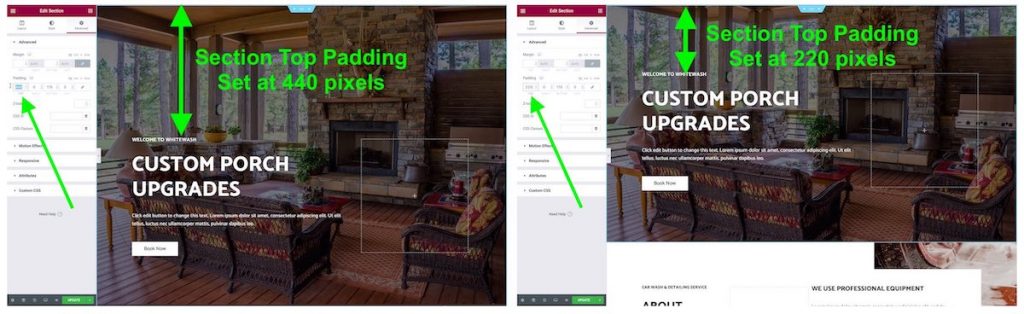
Adjusting the padding to change blank space around an item
You can change the amount of space surrounding a section, column or widget by going to Advanced and adjusting the Margin or Padding.
In our case, we are going to move everything up by reducing the top padding from 440 pixels to 220 pixels.
Step 6: Header: Website Name, Logo and Menu
You can easily add your website name, tagline and logo inside the header. You can also edit the menu items and buttons.
The header customization options are under Appearance > Customize > Header. Site Identity lets you upload your logo and change your Site Title, Site Tagline, and Site Icon.
- Primary Header – Set Layout, Width and Bottom Border.
- Primary Menu lets you personalize the look of your menu, but not menu items. You can also add a widget or a button.
- Transparent Header – If you are using a transparent header, this is where you can adjust how it looks.
To change the Menu items, you need to go back to your Dashboard and then go to Appearance > Menus. There are several options to add items to your menu. You aren’t limited to just pages, but can add all of the following menu items:
- Pages
- Posts
- Custom Links
- Categories
Under Menu Structure you can re-arrange the order in which your menu items appear by dragging them up or down in the list. You can even make some items a sub-item of others by dragging them into the item that you want to be the top level.
Menu settings allows you to automatically add new top level pages to your menu, as well as set the display location to primary menu and/or footer menu.
You can create more than one menu and you can manage where they will be shown.
Step 7: Personalize the Footer
Edit your website’s footer
The footer, like the header, will show up on all the pages of your website, unless you decide that it shouldn’t show on certain pages.
You can add things like your website name, logo, address, phone number, menu and copyright info, among many others.
The footer customization options are under Appearance > Customize > Footer.
From here you can customize the Footer Bar to update things like the copyright message, menu, colors and background.
This is also where you can turn Footer Widgets on or off. To add or remove widgets from the footer, go to Appearance > Widgets.
If you want even more control over the way that your headers and footers look, there is a way to edit them using Elementor. You will need to go to your dashboard and click on plugins and from there, click on Add New and look for the Elementor – Header, Footer & Blocks plugin. Click on install and then activate. Now, under appearance, you will have Header Footer & Blocks listed as an option. It works the same as the Elementor page editor does.
Step 8: Plugins
What is a WordPress Plugin?
WordPress plugins are scripts that add all kinds of functionality to your website. There are thousands of them available to add just about any feature that you can think of to your website.
Some of the more useful plugins are for adding such things as contact forms, SEO, backups, analytics, image optimization and more.
Lots of plugins are made to improve the look of your website with added options for headers and footers, table of contents, social sharing and many others.
Some plugins allow you to import a complete and fully functional website. When we selected and imported an Astra website template, that was done automatically by Astra using their Starter Templates plugin. Depending on which template you chose, it probably installed several other plugins as well, such as a contact form plugin.
There are plugins for specific types of websites, such as plugins for e-commerce, restaurant menus and online courses. No matter what you are trying to accomplish with your website, there is probably a plugin that will do it.
Step 9: Configure your contact form
You will need to configure your contact form so that it will send the contact information to your email address.
If you installed an Astra Starter Website Template, it most likely included a contact form controlled by the WP Forms plugin, although the Contact Form 7 plugin could be there instead.
You can easily find out which one is installed by going to your Dashboard and looking for WPForms or Contact. Click on the link to take you to the contact form configuration options.
Step 10: Privacy Policy and Terms and Conditions
Privacy Policy
It is important that you have a privacy policy available to your website visitors. It used to be that you could do without it, but these days you should really have one in place.
Google tends to frown upon websites that don’t have a privacy policy. Facebook requires that you have one if you want to install a Facebook pixel on your website. Other social media websites also usually want to see that you have a Privacy Policy.
Terms and Conditions
In some instances it is also advisable to have Terms and Conditions listed on your website. For example, if you are selling products or services on your website, you will probably want to include your warranty, returns, order shipping and processing times, and other important information.
Step 11: Register a Domain Name
What is a Domain Name?
Your domain name is your address on the internet. It looks like www.example.com and allows people to find your website.
You will probably want to use the name of your company, product or service, or maybe your own name. It is advisable to try to get the .com version or if its not available, the .net version.
If both of those are taken, it will be time to get creative. You can add a word before or after your domain name and check to see if its available.
If you prefer not to add anything to your domain name, there are many other extensions to choose from, like .store, .cars or .blog. You can see a full list of domain extensions here.
After you register your domain name, you will need to cover an annual renewal fee to continue using it. Epik currently charges less than $9 for new registration as well as renewals.
As with the hosting that looks inexpensive at first glance, be careful with offers of bargain or free domains, because it is usually only for the first year. After that, renewal fees are often more than $20 per year.
Step 12: Get your website to show on your domain
Remember that LiquidWeb created a temporary URL (website name) so that you could begin working on your website even before having your domain name? Now is the time to change that, so that your website will show using your new domain name.
Change DNS on Epik
First, you need to logon to your Epik.com account, click on your domain, go to DNS and change to the following:
ns.liquidweb.com
ns1.liquidweb.com
Make changes at LiquidWeb
Next, logon to your LiquidWeb Manage account at https://manage.liquidweb.com
- On your Managed WordPress Portal, change the A record for your domain to the new IP address.
- Go to Site Details and change the name in the Primary Domain field to your new domain name and click on UPDATE.
- Open a new browser window and type in your domain URL to make sure it is working ok. It might take a few minutes to go live.